


Buyer Questions
The 6.5 Hoverboard has standard 6.5 inch smooth wheels that are best suited for flat surfaces. The 8.5 Hoverboard has 8.5 inch wheels that have a grip best suited for an off road performance on rougher terrain like grass and gravel. The 8.5 hoverboard Model also has a more robust and durable aluminium shell, where as the 6.5 hoverboard model has a hard plastic shell.
The GoMonster Hoverkart has an off road solid rubber front tyre and suspension, allowing for a smoother and more comfortable ride when riding over rougher terrain. The GoMonster Hoverkart is most compatible with the 8.5 Hoverboard, although it is still compatible with a 6.5 Hoverboard. The GoRacer Hoverkart has a hard plastic wheel and does not have suspension. The GoRacer Hoverkart is best suited with the 6.5 Hoverboard to be used on flat surfaces.
All products that are available in stock will be dispatched and delivered within 48 hours. Once dispatched, you will receive DPD tracking notifications via text/email if an email address and contact number has been provided to us. If a product is not available in stock, delivery time scales will be stated on the product page.
8+ is the recommended age to ride a Hoverboard/Hoverkart; however, if you’re above 4 stone and under 18 stone, you’re technically within the weight range to ride a Hoverboard/Hoverkart.
All electronic products purchased from us come with a 12 months warranty. If you experience an electronic related issue with your product, we’re here to get that issue resolved under warranty.
If you experience an issue with your product, please email us with a detailed description of the issue, and if possible, we recommend attaching either an image or a video to the email that best demonstrates the issue you’re experiencing; this will help our team to diagnose the issue. Once we have received your email, you’ll receive a response from our Customer Support Team within a 24 hour period explaining the steps we’ll take to get your item returned.
Care Information
Here is a link on how to perform a master reset on your Hoverboard.
Here is a link to a video on how to connect your Hoverboard Bluetooth.
Here is a video of how to assemble your Go Monster Hoverkart.
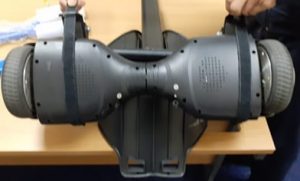
Step 1 – Attach Straps on to Hoverkart clamps (One strap on the Left Clamp and one strap on the right Clamp)
Step 2 – Place hoverboard in between hoverkart clamps

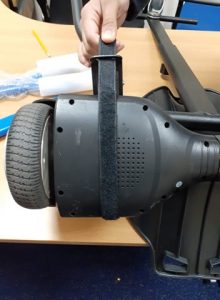
Step 3 – Pass the strap under the hoverboard and pass through the hoverkart clamp.
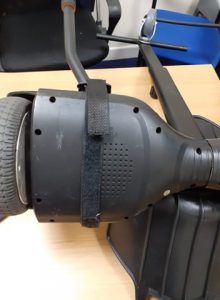
Step 4 – Pull the straps tight and fasten.
Step 5 – Enjoy your Hoverkart

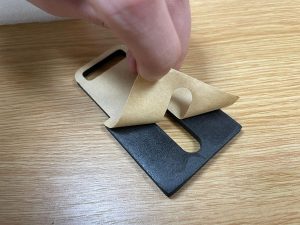
Step 1 – Remove the cut out part on the pad to make a second hole
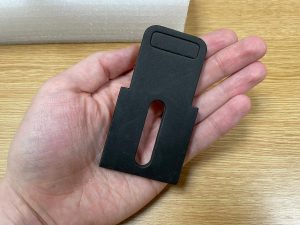
Step 2 – Remove the backing
Step 3 – Line up the adhesive pads at the back so the top hole that you have made by removing the cut out is in line with the hole on the Hoverkart frame so that the straps can pass through

Step 4 – Push the bad down and apply pressure to make sure that they stick to the Hoverkart frame


-Make sure the straps are not attached too tightly across the sensor pads
-Make sure the hoverboard is off whilst you are attaching the go kart to it.
-When the hoverkart is attached to the hoverboard, do not turn it on/off whilst the hoverboard is on the ground. Hold the hoverkart seat up so the hoverboard is lifted slightly off the ground and then press the power button. Hold the Hoverkart off the ground in this position for 5 seconds before you slowly place it back on the ground. Doing this will take weight off of the sensors and calibrate the hoverboard correctly, preventing it from acting erratically. You must repeat this process when turning the hoverboard off.
1. Place the Segway Hoverboard Flat on the Floor on an even surface.
2. Switch the Segway Hoverboard on
3. Ensure both sides of the Segway Hoverboard (Left & Right) are level.
4. Hold the power button for 4 seconds until the LED lights start to flash.
5. When the lights flash, Release the on/off button and leave your Segway Hoverboard as it is for 10 seconds.
6. After 10 seconds, turn the Segboard off to complete calibration.
7. After 5 seconds, turn the Segway Hoverboard back on.
When the hoverboard charger is plugged in to the wall socket, a green light should display on the charger block. When the charger is then plugged in to the Hoverboard, this green light should turn red, which indicates that the Hoverboard is charging.
Also make sure that you never charger your hoverboard overnight.